In a former life I spent a lot of time thinking about how to turn an empty room with chillers, some dark fiber, and a pallet of blank servers into a functioning production datacenter. Though I just tell people to use The Cloud anymore, applications that can’t use the cloud still exist. In particular, what about deploying temporary infrastructure into the world where either power or connectivity are disrupted or entirely unavailable? I made a small project of trying to find a way to create a small, shippable mini datacenter made from Raspberry Pi units that would be remotely manageable without having hands-on access. At $35 a unit this represents a landmark way to get a significant amount of server compute into a small physical footprint for temporary applications in remote locations.
Technical Problem Statement
The core problem in getting this idea to work is finding a way to install an operating system on a Raspberry Pi’s SD card without physically being able to touch the SD card, at least beyond initial prep work. Once the system is deployed, that’s it. Everything else needs to be done remotely including potentially upgrading the OS. I get around this by using a combination of Raspberry Pi’s relatively new net booting and introducing an intermediate stage bootloader (u-boot).
To power this we’re going to use a Netgear switch, simulate a management machine with my laptop, and a Raspberry Pi 3.
From here on out I’m going to switch focus to the nitty-gritty details. I’m going to call this how-to “intermediate to advanced” in difficulty. I try to be as explicit as possible, but it touches several fairly complicated Linux systems that each would be worthy of an explanatory article on their own. Additionally, if something is wrong, the symptom is “a thing without an OS isn’t starting up right.” And that’s a nightmare to debug. Further, it’s unlikely you’ll have the exact materials I use so you ‘ll have to reinterpret some of the sections to make it appropriate. Good luck, I believe in you!
Outline
The general flow is:
- We’re going to get a bootstrapping machine image setup for most required services.
- Prep a Raspberry Pi for netbooting and installing raspbian lite so we can extract a first-attempt root filesystem off it.
- Once netbooting is working, compile u-boot and introduce a new bootloader that gives us network control.
Bill of Materials
Here’s a list of everything I’m using with versions as appropriate:
- VirtualBox 5.2.0 r118431
- Ubuntu 18.04 “Bionic Beaver” minimal install ISO
- Raspbian Stretch Lite 2018-06-27
- Macbook Pro
- Raspberry Pi 3
- 32GB SD Card https://www.amazon.com/gp/product/B0749KG1JK/ref=oh_aui_detailpage_o01_s00?ie=UTF8&psc=1
- Anker USB-C Gigabit ethernet adapter https://www.amazon.com/gp/product/B00ZZ6NW5E/ref=oh_aui_detailpage_o01_s00?ie=UTF8&psc=1
- NETGEAR 5-Port Gigabit Smart Managed Plus Switch https://www.amazon.com/gp/product/B00HGLVZLY/ref=oh_aui_detailpage_o00_s00?ie=UTF8&psc=1
Bootstrapping Part 1: Creating a Management (Virtual) Machine
We need a place to begin the operations. An image on a laptop or something that we can cart into a remote location and begin jumping additional machines.
Setting up VirtualBox
Create a new virtual machine for the project. I create one with:
- 64 bit Linux
- 2GB of memory
- 1 processor
- 20GB dynamically expanding disk image
- Bridged network adapter to my WiFi
- USB 3.0 xHCI Controller
- Fully capture the Realtek USB device (The Anker USB-C ethernet)
Here are screenshots of the settings you’re less-likely to have ever modified if you use VirtualBox. None of this relies on special VirtualBox behavior so if you use a different virtualization system it should still work fine.
 Network settings
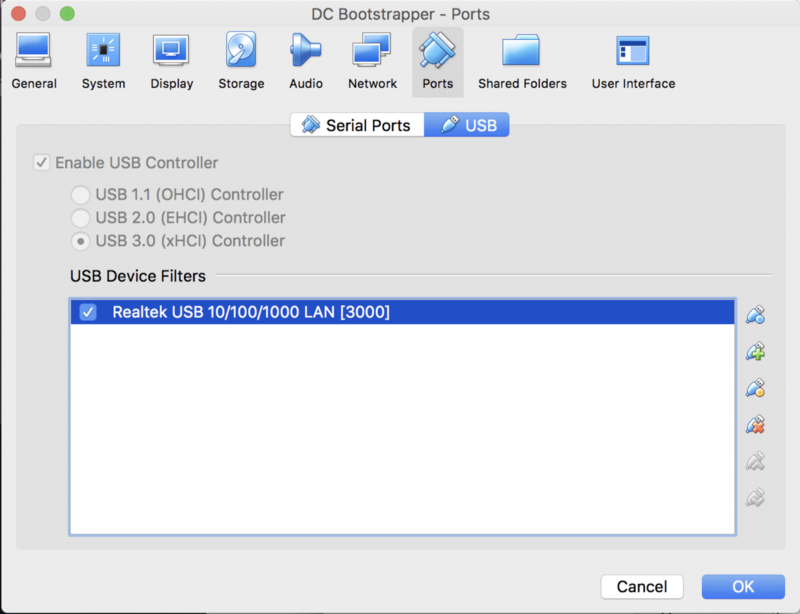 USB port settings
Attach the Ubuntu minimal install image to the virtual machine, power it up,
and install the server basics. The specifics aren’t super important because I
try to include all the specific packages needed. Just keep an eye on space. I
named mine bootstrapper and the default user is chris.
Bootstrapping Part 1a: (Optional) Renaming the network interface
For completeness I’m going to include that I changed my USB-C ethernet adapter
name. This is entirely optional. However, it’s a pain to refer to the USB
interface as (in my case) enx00e04c011f13 instead of usbnet.
The easiest way to do this is get the MAC address of the USB adapter with ifconfig.
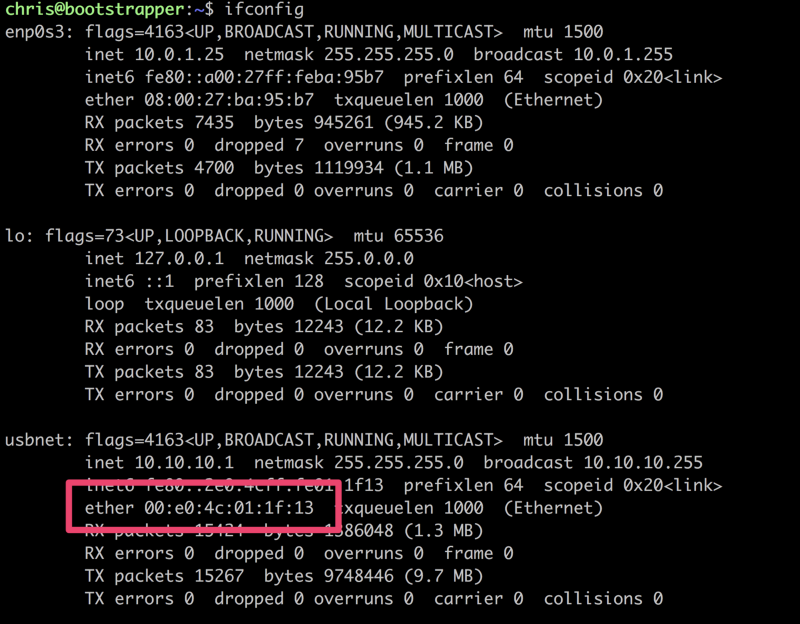 ifconfig output to get the physical MAC address
Create a custom rule for udev in /etc/udev/rules.d/ called 10-usb-
nic.rules with:
ATTR{address}=="00:e0:4c:01:1f:13", SUBSYSTEM=="net", ACTION=="add", NAME="usbnet"
Except replace my example ethernet address with the one from your system. Also
of note, ATTR, SUBSYSTEM, and ACTION all have two equal signs to signal
conditions, and the last one is a single one to signal an action (setting the
name). It ‘s an easy thing to miss. Also, yes, the file must end in .rules.
To apply the changes you need to trigger a change in udev with sudo udevadm
trigger or just restart the VM.
Bootstrapping Part 2: Creating our cleanroom network
We’re going to create a brand new network that’s plugged into that USB-C
ethernet adapter. Everything else will be hung off of that. My laptop is
already on a 10.0.1.0/24 thanks to my wifi, so I’m going to create a new
network as 10.10.10.0/24 so it’s easily distinguished. Edit the config in
/etc/netplan/01-netcfg.yaml
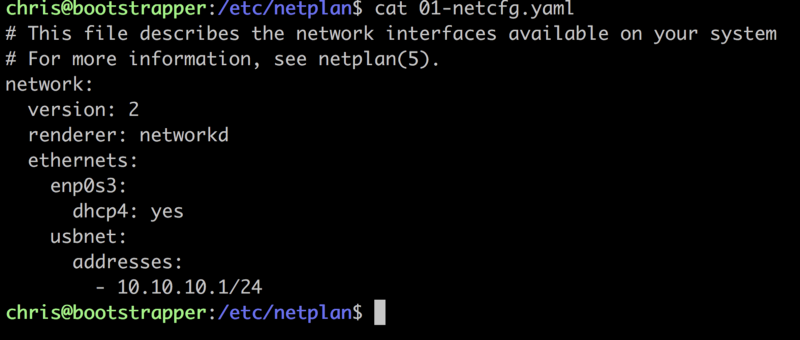 Netplan config
I want the enp0s3 interface to dhcp against my wifi normally, but I want the
usbnet interface to have a static address. It’s going to act as the
router/gateway for this network as well. Make sure to not specify a gateway on
this IP address or every time it comes up Linux will assign an ip default
route through it and make most of your traffic mysteriously vanish.
Apply the configuration with sudo netplan apply. ifconfig should now look
like the one from above in the interface renaming section.
Because this machine is acting as a router/gateway we’re also going to need to
enable IP forwarding, otherwise Linux will not route packets from usbnet to
enp0s3 and our internal network won’t be able to communicate out. Secondly,
because 10.* is normally non-routable
we need to enable iptables’s ip masquerade.
To see if IP forwarding is enabled: cat /proc/sys/net/ipv4/ip_forward. If it
returns 0 it’s disabled, 1 if enabled. To enable it for this current session
sudo sysctl -w net.ipv4.ip_forward=1 and to make it permanent edit
/etc/sysctl.conf and add net.ipv4.ip_forward=1.
To enable IP Masquerade:
sudo iptables -t nat -A POSTROUTING -o enp0s3 -j MASQUERADE
The easy way to make this permanent is to install iptables-persistent and
when it asks you to save the current rules, say yes.
Bootstrapping Part 3: DHCP, TFTP, DNS services
Next up! The Netgear switch could be configured to handle DHCP, but in order
for us to participate in network bootloading we need to be able to control
DHCP optional messages and provide tftp data services. Luckily, and maybe
somewhat surprisingly given the name, dnsmasq combines both of these into a
single package. Run sudo apt-get install dnsmasq.
You can replace the config at /etc/dnsmasq.conf with this example config:
dhcp-range=10.10.10.2,10.10.10.254,255.255.255.0
log-dhcp
enable-tftp
tftp-root=/var/ftpd
pxe-service=0,"Raspberry Pi Boot"
dhcp-rangecontrols what addresses our server will hand out. Since we’re using 1, and 255 is the broadcast, that leaves everything between 2 and 254.log-dhcpwill put verbose logging into /var/log/syslog so it’s easier to diagnose if something goes wrongenable-tftpbecause we want to serve files via tftp on port 69.pxe-servicebecause we want to return all the optional DHCP headers to enable PXE booting.
The server will fail to start if the ftpd directory does not exist. It’s
possible you’ll need to create it: sudo mkdir -p /var/ftpd and make sure
dnsmasq owns it sudo chown -R dnsmasq /var/ftpd
After updating the config restart dnsmasq via sudo service dnsmasq restart.
DNS services where this machine will act as a non-authoritative relay are already included in dnsmasq, so nothing additional to do there. Requests will be made according to the management machine’s default DNS.
Intermission
At this point you have a virtual machine that has all the services in place to bootstrap a new machine via PXE (or at least something PXE-like). The next several steps are going to switch gears and work on the pi. First we need to enable its netbooting features and then we need to extract all the boot pieces from the SD card and move them to the bootstrapping server.
Raspberry Pi Prep Part 1: Installing Raspbian Lite
I’m not going to cover the Raspberry Pi installation at great depth since they’ve put a significant amount of time in to documenting it well. The NOOBS installer is pretty great https://www.raspberrypi.org/downloads/noobs/ and only takes a few minutes.
At the end of this step you should have a working + bootable SD card that gets you to a shell. Enable OpenSSH server and make any other tweaks you normally would. Theoretically, when the pi is plugged into our lab network it should be able to DHCP just fine and connect out to the internet.
Raspberry Pi Prep Part 2: Enable network boot mode
Next up, we have to reconfigure the Pi to boot via the network. In order to do this we need to enable usb boot mode on the device. The official instructions are here, but it’s as simple as adding one line to a config file and rebooting.
How to boot from a USB Mass Storage Device on a Raspberry Pi 3 - Raspberry
Pi Documentation
_This section contains documentation with technical information about the
Raspberry Pi hardware, including official
…_www.raspberrypi.org
Raspberry Pi Prep Part 3: Extracting the boot pieces and mirroring root
volume
It’s time to get all the boot data from the pi and copy it to the bootsrapping
machine. My Raspberry Pi is running on 10.10.10.126 for these examples.
Assuming ssh is working from the management side this is pretty
straightforward:
scp -r pi@10.10.10.126:/boot ~
sudo cp ~/boot/* /var/ftpd
On the Raspberry Pi we’re going to tar up the root volume and copy it over to the management machine. Quick install of rsync and make an nfs directory directly under root.
sudo apt-get install rsync
sudo mkdir -p /nfs/client1
sudo rsync -xa --progress --exclude /nfs / /nfs/client1
cd /
sudo tar cf backup.tar nfs/
I don’t bother compressing this backup because it takes a long time on pi.
scp the backup.tar to the bootstrapping machine, move it to / and then sudo
tar xf backup.tar. Make sure to do it as root to preserve the permissions of
the original filesystem otherwise you’ll get some really funky behavior.
Once the files are extracted we need to edit /nfs/client1/etc/fstab and
remove the references to /dev/mmcblk0p6 references or it won’t boot.
Aside: Because I’m sort of mixing+matching distributions of Linux without some sort of config management system, UIDs are not consistent across machines. Any file that’s owned by ‘pi’ on the Raspberry Pi is going to retain it’s UID on the management machine and suddenly appear owned as ‘chris’ my default user. This is “correct” in the technical sense but might look funny if you aren’t expecting it.
Bootstrapping Part 4: Enable NFS
Still more work to do on the management machine! Now that we have a mirrored
copy of the pi’s root filesystem sitting at /nfs/client1 we need to enable
NFS so it can be remotely mounted + booted.
Add the following line to /etc/exports
/nfs/client1 *(rw,sync,no_subtree_check,no_root_squash)
And enable the appropriate services
sudo systemctl enable rpcbind
sudo systemctl restart rpcbind
sudo systemctl enable nfs-kernel-server
sudo systemctl restart nfs-kernel-server
Bootstrapping Part 5: Update /var/ftpd/cmdline.txt
Everything is nearly in place to have rudimentary netbooting. We need to
update /var/ftpd/cmdline.txt to refer to our new NFS root volume. The file
should contain on a single line:
dwc_otg.lpm_enable=0 console=serial0,115200 console=tty1 root=/dev/nfs nfsroot=10.10.10.1:/nfs/client1,vers=3 rw ip=dhcp rootwait elevator=deadline
Intermission Again
Whew. At this point, if you remove the SD card from the Raspberry Pi and plug
it in, it should be able to boot from the network and get to a shell! If
dnsmasq ‘s verbose logging was enabled you can check out /var/log/syslog and
you should see DHCP activity.
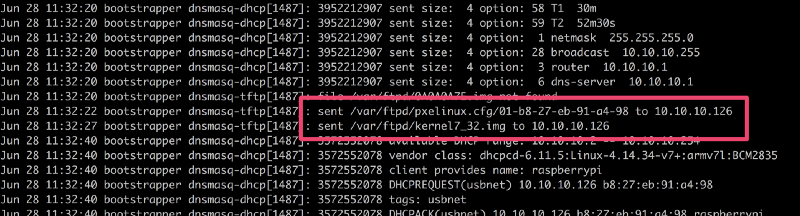
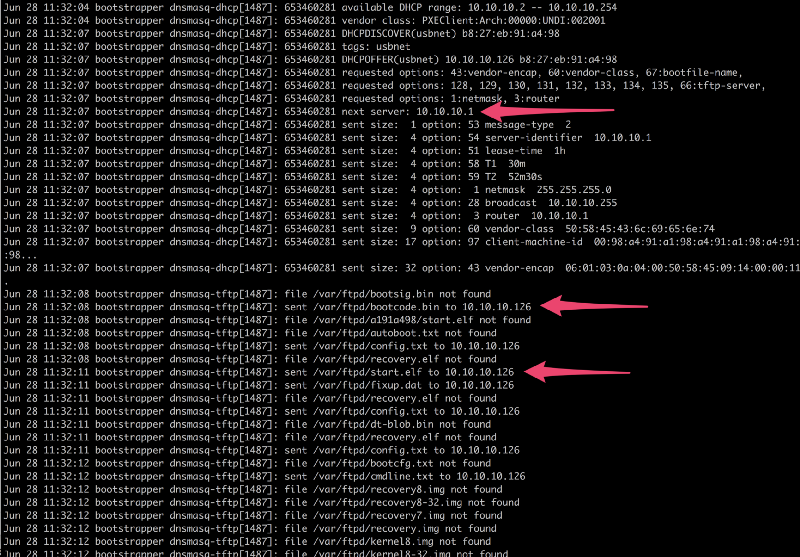 Example of DHCP next server, bootcode.bin and start.elf being served over tftp
You’ve earned a coffee. Go take a break. This is a long how-to.
Dynamic Boot Choices Part 1: We need u-boot
So as I said above, the real problem with remotely managing Raspberry Pis is how to dynamically update them without having your hands on them. We can ‘t pop the SD card in and out in this scenario. We’re going to need an intermediate bootloader that we’re going to be able to access a network with and make additional choices before bootstrapping the OS.
Back to the management machine.
First, because the management machine is x86_64 and our target machine is ARM, we’re going to need a cross compiler. Thankfully, Ubuntu packages one we can install:
sudo apt-get install gcc-arm-linux-gnueabi build-essentials flex bison


git clone --depth 1 git://git.denx.de/u-boot.git u-boot/
cd u-boot
We’re going to need to cross-compile a 32-bit version of u-boot specifically targeted toward a Raspberry Pi.
export CROSS_COMPILE=arm-linux-gnueabi-
make rpi_3_32b_defconfig
make
Now to do some re-arranging. Within /var/ftpd we’re going to:
- Rename
kernel7.imgtokernel7_32.img - Copy
u-boot.binfrom the build directory tokernel7.img - Make a new directory in here called
pxelinux.cfg chowneverything so dnsmasq can read it
Now, when the Raspberry Pi network boots it will load kernel7.img as usual,
but instead of being a complete Linux kernel, it’s going to load u-boot
instead. U-boot is going to know it got loaded via the network and will then
magically begin to emulate PXELINUX giving us a much easier to control
bootloader.
Dynamic Boot Choices Part 2: PXE Linux config
PXE Linux figures out what to do by searching the tftp directory for certain key files. The first file it’s going to look for starts with 01 (for the first physical network interface it could locate) and then the entire MAC address in it.
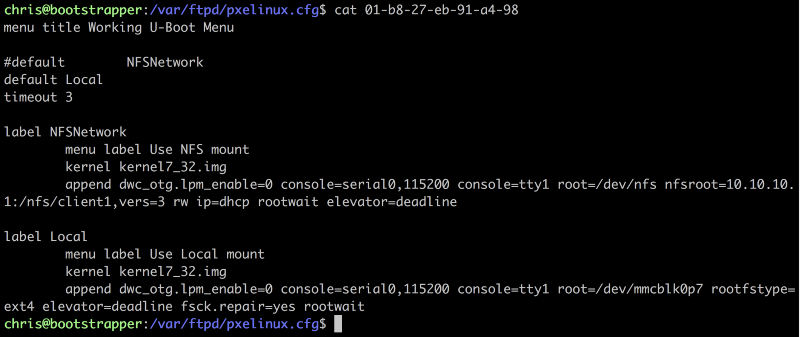
My configuration is:
menu title Working U-Boot Menu


#default NFSNetwork
default Local
timeout 3


label NFSNetwork
 menu label Use NFS mount
 kernel kernel7_32.img
 append dwc_otg.lpm_enable=0 console=serial0,115200 console=tty1 root=/dev/nfs nfsroot=10.10.10.1:/nfs/client1,vers=3 rw ip=dhcp rootwait elevator=deadline


label Local
 menu label Use Local mount
 kernel kernel7_32.img
 append dwc_otg.lpm_enable=0 console=serial0,115200 console=tty1 root=/dev/mmcblk0p7 rootfstype=ext4 elevator=deadline fsck.repair=yes rootwait
What this says is wait for 3 seconds (in case a keyboard is plugged in and you
want to override the choice) and then, depending on which label is specified
under default, go ahead and try to boot that. Now our server is in charge of
which path it’s going to take. If we want to make sure the machine boots via
NFS, we can change the default and power cycle the device. You can also see
the renamed original Raspbian kernel kernel7_32.img in the configuration.
Before we try booting this way though we have to tamper with both the boot and
the recover volume on the SD card that’s sitting in the pi. If the boot
firmware locates bootcode.bin and start.elf it’s going to try and perform
a local boot. So I plugged the card into my laptop and renamed them to
bootcode.disabled and start.disabled on both partitions. We want the boot
partition to fail, but leave the EXT4 root file system intact for this to
work.
 Example serving the PXELinux config and the renamed original kernel
Moment of Truth: Installing an OS onto the SD Card
All the pieces are finally in place. Set the pxelinux.cfg for the raspberry
pi to netboot. We can run lsblk to confirm that none of the partitions are
mounted or being used as a root FS.
 lsblk output showing / is not local
In this example it auto-mounted /boot because it was present, but on my
particular card it’s empty. Go ahead and unmount it so we have unrestricted
access to /dev/mmcblk0.
I’ve also placed the Raspbian lite install image into the pi user’s home directory directly on the management machine (which is made easy because this is all NFS).
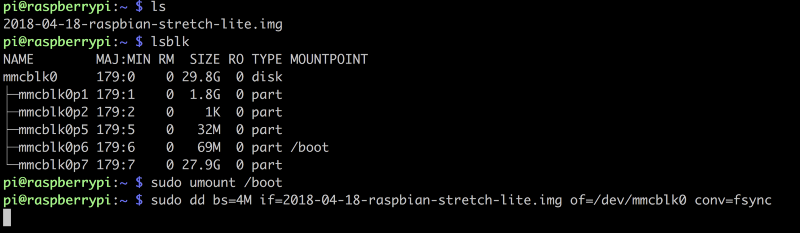 Raspberry Pi dd-ing the image into place on its own SD card
For convenience I’m going to mkfs over the fat partition just to make sure
that whatever boot info was placed into that partition won’t be used so it has
to netboot on startup.
sudo mkfs -t vfat /dev/mmcblk0p1
Go back to the management machine and set it to boot locally. At this point we
also need to make one minor tweak. Because I used NOOBs to install the first
time, and a raw image the second, the partition specified in the
pxelinux.cfg directory needs to be updated. The local boot before was
root=/dev/mmcblk0p7 and now needs to be root=/dev/mmcblk0p2. Restart the
Raspberry Pi.
And voila! It correctly booted into its new OS which we installed on its own SD card via the network.
 Raspberry Pi booting locally w/ first-time boot tasks running
 I didn’t enable SSH server before restarting…
Future Direction
I’m going to continue exploring this idea. At this point, because it really looks like any traditional management platform, we could do any number of things. Next up would be adding in a system like ansible or chef so we could write a basic image to the SD card and when it boots it begins secondary configuration tasks. A good example would be participating in something like a Kubernetes cluster.
Another interesting direction would be to try and create a management machine from an Intel NUC. Since the ideal deployment scenario is likely to be untrusted, there’s a ton of interesting work around SGX and platform trust to see if we could really lock down the management machine for security. Or for redundancy, create a pair of secure mirrored NUCs for fault tolerance.
Bibliography & Additional Reading
Raspberry PI: network boot explained - raspibo
_This example-tutorial uses a Raspberry PI as a boot client and a Debian
server (maybe another Raspberry PI running
…_www.raspibo.org
How to Network Boot a Raspberry Pi Without a MicroSD Card
These days you can run your Raspberry Pi using network boot, eliminating the
need for microSD cards completely.
www.makeuseof.com
Examples | netplan.io
_Netplan is a YAML network configuration abstraction for various backends. It
allows for easily configuring networks by
…_netplan.io
HOWTO: Setup dnsmasq as DNS DHCP - Beware Here Be Musings
_This post will explain how to Setup dnsmasq as DNS DHCP. This description of
dnsmasq shamelessly taken from the dnsmasq
…_blogging.dragon.org.uk
RPi U-Boot - eLinux.org
_inside the directory and install the debian package built one level up. This
will automatically modify config.txt to
…_elinux.org
Build 64-bit kernel for Raspberry Pi 3, using native tools
_Guide on how to build a 64-bit kernel for the Raspberry Pi 3 & 3+ boards, on
device, using native
64-bit…_www.tal.org
Network Boot Your Raspberry Pi - Raspberry Pi Documentation
_This section contains documentation with technical information about the
Raspberry Pi hardware, including official
…_www.raspberrypi.org